Tuesday, March 27, 2012

Rolling an edge into a blind hole in a Fancy Feast can...


Figured out how to achieve what I wanted.
Take a Fancy Feast can. Open a small hole in the bottom of the can, and "remove" the contents (I use the non-business end of a spoon). Feed to Lovie or Minnie-Moo. Wash out the can...you now have an intact FF can: the pull-ringed top is still attached to the can.
I use a Dremel and a sanding disk to smooth the edges of the hole to about seven eight's diameter, finish the edge with fine emery paper so there are no nicks or blemishes in the edge. Blemishes will start cracking if present during the next steps.
Make yourself a tool like I show. I used the stainless steel mounting hardware for a bicycle rack. You need something that's quite a bit stronger than the thin-walled aluminum can, and fairly small sectioned as you will eventually need all the probing power and clearance possible when working the can edge to vertical.
Go slowly around the edge of the can in small steps, gradually creating an edge that rolls inwards towards the top of the can. I found that about three passes worked well, in steps of 30, 60 and finally 90 degrees. Take your time, and resist the temptation to do it in just two passes (helps prevent cracks in the edge if you roll in gradually).

Saturday, March 17, 2012

Two two-way stoves...

The squatter stove is made from Arizona iced tea cans, the other from Miller lite bottles.
Both work with a pot stand to boil, or just place the pot directly on the stove itself and they become simmer stoves.

Thursday, March 01, 2012

Video of my homemade twist to simmer stove in action...

It's really hard shooting a video, doing a voiceover, and adjusting a hot stove all simultaneously ;-)

Stove with lots of self control...

Use it without any attachment and it boils fast. Put on the snuffer plate, and the stove switches to a low simmer (flame now comes out of the side holes instead). Or put on the simmer ring and adjust the central flame incrementally.


Also, a shot of the snow outside. See most of the stoves I have made so far on the window ledge.

Wednesday, February 22, 2012

Three ouncer, Brasslite homage....

Fancy feast can, Red Bull type inner. Simmer control via leg adjustment, also via simmer ring. A tea light candle fits perfectly too!!
Boils fast. Perfect flame.

Thursday, February 16, 2012

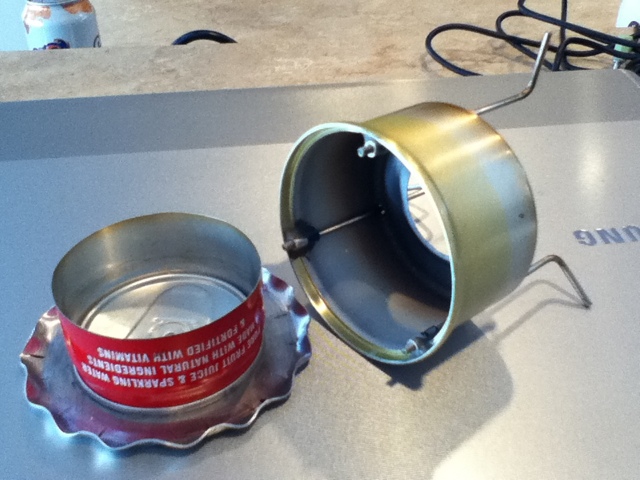
Latest stove...twist to simmer...

Fully adjustable simmer from 0 to 100%, just twist to set. Removable pot stand legs. Interchangeable internal fuel chamber can be swapped for different containers permitting differing heat outputs/faster boil times/lower simmers. Primer base built in to the stove. Additional simmer plates can be used for extreme flame control.
Construction hours??? Don't ask ;-)

Monday, February 13, 2012

Alcohol backpacking stove with continuously variable simmer control...


The latest in a long line of prototypes.
Maybe the most difficult stove to make so far, it's especially difficult achieving the accuracy of construction that this application of simmering control demands.
Each spoke leg/simmer control/pot stand support screws out (from a baseline that is the end of the spoke being level with the bottom of the larger can)eight full turns. This gives a degree of simmer from 100% down to 0%. Additionally, a simmer ring can be placed on top of the stove.
The stove permits fast swapping of the inner 3 ounce can for other cans with different hole configurations punched into them, giving a tremendous variation of heat output.
The only real drawback to this design is that the simmer control needs to be done with the larger can/spokes not hot. Otherwise, you'd need heat-resistant gloves to turn the very hot spoke ends. In other words, the degree of simmer has to be set before the stove is lit. I am currently working on a design that will permit real-time adjustment, even with the stove roaring.

Four different stoves. All using cat food cans.

Saturday, February 11, 2012

Wood-Gas stove...


A clone of the Bushwhacker, with a small add-on to enable flame control. Made out of a quart paint can, a 29 ounce tomato can, some hardware cloth, and a 19 ounce Progresso Soup can for the fire container.
The flame control ring has holes in it which exactly match the vent holes in the paint can. Turn the paint can a small amount and the holes are either exposed or closed, or somewhat in between.
Everything nests within the paint can for storage, including the pot support.

Friday, February 10, 2012

Backpacking baking attachment...


I found locally the perfect bowl that fits exactly/perfectly inside my MSR 1.1 litre pot ( thus will fit anything larger too), and constructed a air-gap spacer for the bottom out of a spoke (it's actually a very short tripod).
The greatest thing too, is that the inner bowl is a very useful size for backpacking in its own right: it's 5.375 inches in diameter by 2.5 inches deep, with a small lip, and a very small lower radius between the wall and the base. This makes it useful as a soup/cereal bowl, or to have a side dish in. The bottom is flat, so it'll sit on any stove well if used by itself, and the gauge of it is exactly the same as my MSR pot, and it's stainless!!!
I decided to drill it around the rim for 2 reasons:
1...the holes allow a little more airflow, and thus temperature equalization.
2...in 2 of the holes I screwed small screws and nuts. As the pot is such a perfect fit, it's nice to have something to hold on to to extract the baked goodies afterwards.

Monday, February 06, 2012

Modular Alcohol stove, with simmer adjustment...


Been fiddling around making lightweight alcohol stoves lately. It's become a consuming addiction.
Anyway, the latest creation is a stove made principally from a Friskies can, and in to the modular base you can insert a variety of Fancy Feast cans, which can give various burn properties based on the hole configurations punched into them.
Priming plate is built in, though the stove needs very little priming.
Lastly, I devised a way of minimizing or maximizing the air flow to the stove by way of a simple twist of the Friskies can relative to the base. This gives a steady simmer when closed, full blast when open.
One can also use a variety of simmer plates on the top of the stove too, giving even more granular flame control.
Weight is 35 gram. Boils a pint of 55 degree water in about 4 minutes 20 secs in my basement with no wind. Flame is very uniform and even, burns clear on both high and simmer.

Friday, February 03, 2012

Latest home made stove....

With simmer attachment. Weighs 35 gram.

Monday, January 30, 2012

Home made alcohol stove and stand

Been developing a home made alcohol stove lately. Made from old cans and a little secret sauce. Boils a pint in about 4.5 mins in my basement, using Heet or denatured alcohol. The stand is built in, but I show it with a stand I made for my Trangia and other home made stoves. Droppers are from RiteAid.

Monday, January 09, 2012

Monday, December 26, 2011

87 Ritchey Commando...

All XT and Ritchey Logic, Specialized tires and rims.

Friday, October 07, 2011

Oh shit!!!...

So, I had honed the blades on my Leatherman Wave multi-tool to within an inch of their lives, so shaving sharp, and was using it today to cut the weather stripping in our doors to length.
The tool dropped, point first into/through the fleshy part of my left hand, from about a foot or two.
It stuck there momentarily as blood started pumping out a shade of red I had forgotten existed. Time does compress in those circumstances.
Just time for an "Oh Shit!!!" before I rushed to the nearest sink and ran it under cold water.
A butterfly stitch later (knew there was a reason I bought them 10 years ago and brought them across country with me) and all is well, but it's a very strange feeling watching a blade go into one's hand, and vital fluids pump out.
Luckily it missed the tendon of my left index finger by half an inch ;-)

Thursday, August 18, 2011

Final prototype...


Here are 2 pics of my final prototype iPod Touch stand. Made from a single 14 gauge stainless steel bicycle spoke, and a couple of short lengths of shrink-wrap tubing. The angle it holds the 4th generation iPod Touch varies from 43 to 75 degrees, and because I carefully balanced the whole pivoting feature, it stays in position anywhere between those two extremes.
Also in the pictures is the stylus I made for my Jornada 728, an Ebay purchase that was missing its stylus. It's made of tubes of Brass, Aluminum and Copper, with a handmade stylus point from acrylic. It's quite a bit heftier than the plastic original. Nice!

Nice knife...


Crocodile Dundee would be proud to own this knife.
The image came from a post on the EDC Forums, where an owner had gutted a Victorinox Swiss Army knife, then buffed and polished it beyond belief, and then reassembled it with a bunch of polished titanium hardware, liners, toothpick and tweezers.
It's a work of art.

The new travel rig...


Here's a couple of pics of my iPod Touch resting on a stand that I made recently from an old bicycle spoke. In front of it is the Apple bluetooth keyboard that I just bought (2nd hand, but looks unused) from a member of the Ars Technica Classifieds.

Here's a breakdown of the weights of the components in the system:
iPod................................3.56oz
Stand...............................0.3oz
Charging cable and power adapter....2.0oz
Keyboard...........................11.4oz

Total..............................17.46oz

It would be hard to find any system that offers such capability, good looks, and such a low combined weight. Bear in mind, that an iPad alone weighs 21.3oz, and then you would be typing on a sub-optimal virtual keyboard.

A few things to note.
1...Apple says that the Bluetooth Keyboard has a minimum system requirement of "an iPad". Whatever that means, rest assured that it pairs with, and works with, an iPod perfectly.
2...Almost all of the special function buttons on the top row of the keyboard work perfectly with the iPod. Just a couple don't work, and that's because the iPod simply doesn't have the equivalent function built-in.
3...Pairing is almost instantaneous, there is also zero lag time between a key press and the result appearing on the screen.
4...There is an "eject button" on the keyboard (the top right button on the keyboard). This is essentially a toggle between the Bluetooth keyboard, and the on-screen iPod Touch keyboard.
5...I built the stand with the ability to change the screen angle. This is useful when setting it up for optimum viewing, whether typing, or watching video.

Monday, August 15, 2011

What's on my iPod...

Here's what's in my playlist in the "Podcaster" app on my iPod Touch, 4th generation:
http://feeds.feedburner.com/cnet/conversations
http://cravepodcast.cnettv.com/
http://feeds2.feedburner.com/cnet/digitalcityvideo
http://rss.cnn.com/services/podcasting/fareedzakaria/rss.xml
http://feeds.feedburner.com/freakonomicsradio
http://feeds.feedburner.com/hypercritical
http://revision3.com/lifehacker/feed/MP4-hd30
http://leo.am/podcasts/mbw/
http://feeds.feedburner.com/motr
http://feeds.pbs.org/pbs/wgbh/nova-video
http://www.hbo.com/podcasts/billmaher/podcast.xml
http://feeds.feedburner.com/TEDTalks_video
http://revision3.com/tekzilla/feed/quicktime-small?subshow=false
http://feeds.feedburner.com/cnet/applebyte
http://feeds.feedburner.com/thetalkshow
http://feeds.feedburner.com/tii
http://twit.tv/node/8741/feed
http://feeds.feedburner.com/atd/mossberg/video-feed
http://feeds.pbs.org/pbs/weta/washingtonweek-video
http://leoville.tv/podcasts/ww.xml

Try a few, there are some excellent podcasts there.

Thursday, August 11, 2011

iPod Touch or iPhone stand...


I had a few spokes from a bicycle wheel I had disassembled, and thought I would try making a stand for my iPod Touch.
After a couple of tries, I came up with this. Note that it allows for viewing at two different angles.
Simple, easy, and uses recyled materials: what's not to like?